draw font in 3d xna
- Download source - 12.95 KB
Introduction
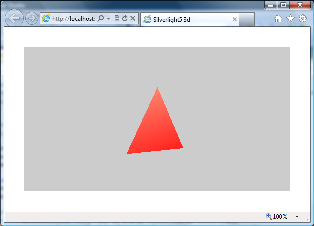
This article presents the simplest possible Silverlight/XNA programme: a basic spinning triangle, albeit with full 3D lighting furnishings. It is the 3D equivalent of the classic 'Howdy World' plan. Information technology comprises nigh 50 lines of lawmaking, and the rationale behind every line is explained.
Background
I of the biggest new features in Silverlight-5 is full GPU accelerated 3D graphics using the XNA framework.
The combination of Silverlight and XNA will enable a whole new class of 3D applications to run directly from the web, including applications in scientific discipline, engineering, product marketing, business and the geo-spatial fields.
The XNA framework gives programmers a lot of power to control the graphics hardware in a adequately direct way, and some impressive results are possible. But while XNA simplifies 3D programming considerably, especially when compared to DirectX or OpenGL, information technology is still a relatively low-level technology and Silverlight programmers with no previous experience of 3D programming can face a steep initial learning curve. To make matters worse, because this is a new engineering, the documentation is currently a bit patchy and the few samples that are available don't ever testify the easiest ways to practise things.
Getting Started
You will demand to set up up your Silverlight 5 development environment first and there is plenty of data available on the web already about that, and then in that location's no need to repeat it here.
Once you're set up with the tools, here are the steps to build your first XNA awarding:
- Fire upwards Visual Studio and create a new Silverlight 5 application.
- Drop a '
DrawingSurface' control onto your master page. This is where all the 3D magic happens. - If you lot can't see the '
DrawingSurface' control in the toolbox, y'all may demand to right-click and 'Choose Items...' to add it. - Add a '
Draw' result to the Cartoon Surface. - In the event handler, add two lines of lawmaking:
GraphicsDevice g = GraphicsDeviceManager.Current.GraphicsDevice; g.Clear(new Color(0.8f, 0.8f, 0.8f));
- Add ii '
using' directives:using Microsoft.Xna.Framework; using Microsoft.Xna.Framework.Graphics;
- Remove unnecessary '
using' directives, particularlySystem.Windows.Media, otherwise you will have two alien definitions ofColorand the project won't compile - Add the following to the
<object>element in your HTML or ASPX test page:< param name =" EnableGPUAcceleration" value =" truthful" / >
- Striking F5 and you should run across a lite gray rectangle in the browser.
Of course, this is no ordinary Silverlight greyness rectangle, it'southward a GPU accelerated XNA rectangle!
Like shooting fish in a barrel plenty and so far, now let'southward add some 3D.
Calculation 3D
Here'south the code in its entirety:
using Organisation.Windows.Controls; using System.Windows.Graphics; using Microsoft.Xna.Framework; using Microsoft.Xna.Framework.Graphics; namespace Silverlight5_3d { public partial class MainPage : UserControl { private float aspectRatio = 1f; public MainPage() { InitializeComponent(); } individual void drawingSurface1_SizeChanged (object sender, System.Windows.SizeChangedEventArgs east) { aspectRatio = (float)(drawingSurface1.ActualWidth / drawingSurface1.ActualHeight); } private void drawingSurface1_Draw(object sender, DrawEventArgs e) { GraphicsDevice g = GraphicsDeviceManager.Current.GraphicsDevice; 1000.RasterizerState = RasterizerState.CullNone; chiliad.Clear(new Color(0.8f, 0.8f, 0.8f, i.0f)); VertexPositionNormalTexture[] vertices = new VertexPositionNormalTexture[]{ new VertexPositionNormalTexture(new Vector3(-1, -1, 0), Vector3.Frontward,Vector2.Zip), new VertexPositionNormalTexture(new Vector3(0, 1, 0), Vector3.Forward,Vector2.Nada), new VertexPositionNormalTexture(new Vector3(ane, -1, 0), Vector3.Forward,Vector2.Zero)}; VertexBuffer vb = new VertexBuffer(g,VertexPositionNormalTexture.VertexDeclaration, vertices.Length,BufferUsage.WriteOnly); vb.SetData(0, vertices, 0, vertices.Length, 0); g.SetVertexBuffer(vb); BasicEffect basicEffect = new BasicEffect(g); basicEffect.EnableDefaultLighting(); basicEffect.LightingEnabled = true; basicEffect.Texture = new Texture2D(yard, 1, 1, false, SurfaceFormat.Colour); basicEffect.Texture.SetData<color>(new Color[1]{new Color(1f, 0, 0)}); basicEffect.TextureEnabled = truthful; basicEffect.World = Matrix.CreateRotationY((bladder)e.TotalTime.TotalSeconds * ii); basicEffect.View = Matrix.CreateLookAt(new Vector3(0, 0, 5.0f), Vector3.Zero, Vector3.Upwards); basicEffect.Projection = Matrix.CreatePerspectiveFieldOfView (0.85f, aspectRatio, 0.01f, grand.0f); basicEffect.CurrentTechnique.Passes[0].Apply(); g.DrawPrimitives(PrimitiveType.TriangleList, 0, 1); eastward.InvalidateSurface(); } } }
There's not too many lines of code, but in that location's a lot going on, so let's suspension it downward.
Drawing Primitives
XNA is quite a low-level framework that works directly with the graphics hardware, then the only things that it knows how to draw are triangles and lines. In our plan, the code that does the drawing is:
g.DrawPrimitives(PrimitiveType.TriangleList, 0, 1);
This instructs the GPU to depict a triangle using a pre-loaded buffer of vertices.
Vertex Buffers
XNA provides four congenital-in options for vertices and you can too ascertain your own custom varieties. All vertices take a 3D position defined using a Vector3 structure, and they can have additional attributes such as colour, texture coordinates and a lighting 'normal'. Nosotros desire our program to have realistic 3D lighting, so we employ the VertexPositionNormalTexture structure.
Our program has a single triangle so nosotros create an array of 3 vertices. We define the 3D position coordinates so that the triangle lies on the X-Y plane, and we define the lighting 'normals' to be at right-angles to this, i.e. 'forrard' along the Z-axis. We define the texture coordinates as (0,0) because we are going to use a one pixel flat colored texture bitmap.
Once nosotros have our array of vertices, we wrap it in a VertexBuffer course and send this to the GPU.
VertexPositionNormalTexture[] vertices = new VertexPositionNormalTexture[]{ new VertexPositionNormalTexture(new Vector3(-1, -1, 0),Vector3.Frontward,Vector2.Zero), new VertexPositionNormalTexture(new Vector3(0, 1, 0),Vector3.Forwards,Vector2.Goose egg), new VertexPositionNormalTexture(new Vector3(1, -1, 0),Vector3.Frontwards,Vector2.Cypher)}; VertexBuffer vb = new VertexBuffer (g,VertexPositionNormalTexture.VertexDeclaration, vertices.Length,BufferUsage.WriteOnly); vb.SetData(0, vertices, 0, vertices.Length, 0); g.SetVertexBuffer(vb);
The GraphicsDevice Form
The GraphicsDevice course is central to XNA, it is used to control the GPU. There is merely one example of information technology, which you get through a static property of the GraphicsDeviceManager class.
The GraphicsDevice class has methods for drawing primitives and for setting up vertex buffers as covered above. It also has quite a few other properties and methods for controlling the details of the 3D rendering process. For our uncomplicated plan, we leave everything with its default settings, except for 'RasterizerState' which we change to 'CullNone'. The default is not to describe the back side of triangles, because typically they are out of sight on the within of 3D objects, but our 3D model is a single triangle and nosotros want to be able to see both sides of information technology.
GraphicsDevice thou = GraphicsDeviceManager.Current.GraphicsDevice; g.RasterizerState = RasterizerState.CullNone; g.Articulate(new Color(0.8f, 0.8f, 0.8f, 1.0f));
Effects
XNA offers a choice of 5 different 'Effect' classes, which wrap up a lot of the depression level details of talking to the GraphicsDevice. We'll use the 'BasicEffect' grade, which is actually quite powerful - it includes a very prissy 3D lighting gear up-up every bit standard.
BasicEffect basicEffect = new BasicEffect(g); basicEffect.EnableDefaultLighting(); basicEffect.LightingEnabled = truthful;
For ultimate low-level control, it is possible to program XNA without using the congenital-in Effect classes by working directly with the GraphicsDevice object. You tin even program your ain custom pixel shaders and vertex shaders. Merely the congenital in Issue classes, particularly the BasicEffect, make things a lot easier.
Textures
In XNA, 3D scenes are made upward of triangle meshes overlaid with textures. Textures are simply second bitmaps – the XNA course is Texture2D. They are sent to the GraphicsDevice using the Upshot class and each triangle vertex specifies its 2D coordinates within the texture. By convention, these texture coordinates are called U and V.
In many XNA applications, particularly games, textures are created offline and and then loaded in at run-time. For our unproblematic programme, we programmatically create a one pixel texture of solid cherry-red.
basicEffect.Texture = new Texture2D(m, one, one, false, SurfaceFormat.Color); basicEffect.Texture.SetData<colour>(new Color[i]{new Color(1f, 0, 0)}); basicEffect.TextureEnabled = true; </ color >
Matrices and 3D Transformations
This is the heart of 3D programming. The vertices in our vertex buffer define the locations of the three corners of the triangle within our 3D virtual earth, merely these 3D coordinates demand to exist converted into 2nd screen coordinates before anything can be displayed.
There are three stages to this process and each phase uses a 3D transformation divers using the Matrix class. The Matrix class actually represents a 4 x iv matrix of floating betoken numbers, just its primary function is to transform 3D coordinates, defined by the Vector3 class, through the basic operations of translation, rotation and scaling.
basicEffect.World = Matrix.CreateRotationY((float)east.TotalTime.TotalSeconds * 2); basicEffect.View = Matrix.CreateLookAt(new Vector3(0, 0, 5.0f), Vector3.Zero, Vector3.Up); basicEffect.Projection = Matrix.CreatePerspectiveFieldOfView (0.85f, aspectRatio, 0.01f, k.0f);
Step one is to convert from model coordinates to globe coordinates. This is chosen the World Transform. In our program, we have one model, a single triangle, and the World Transform is used to define where it is and how information technology is oriented in our 3D virtual world. If our 3D scene had several models, or several instances of the same model, they would each take their ain World Transform. Nosotros just have one model, but it does rotate in existent fourth dimension. So we utilise a Earth Transform to represent a rotation based on elapsed fourth dimension.
Footstep two is to catechumen from earth coordinates which are centred on the 'origin' of our virtual world, to view coordinates, which are centred on our view point or photographic camera position. This is chosen the View Transform. The Matrix class has a convenient method (CreateLookAt) for creating a View Transform based on the camera position and the eye bespeak of what it'south looking at.
Step three is to convert from the 3D coordinates in our virtual world, to 2D screen coordinates. For consistency, this step is besides done using the Matrix class, then the output is 3D coordinates, simply only the X and Y values are used for creating the 2D rendered image on the screen. This stride is called the Projection Transform and XNA offers two choices: orthogonal and perspective. With the orthogonal option, objects further from the camera do not appear smaller. The perspective option is the more 'natural' view where afar objects announced smaller. The Matrix class too provides a convenient method (CreatePerspectiveFieldOfView) for creating the Projection Transform based on the camera properties, in particular the lens angle (i.e. wide bending or telephoto) expressed as radians in the Y axis.
Once our iii transformation matrices are set up, the BasicEffect class takes intendance of setting up the GraphicsDevice to return our 3D scene onto the 2nd screen.
Upshot Passes and Techniques
All XNA'southward congenital-in Effect classes inherit from the Upshot base class, which encapsulates the concepts of 'Techniques' and 'Passes'.
Techniques provide culling rendering effects that can be selected at depict-time, possibly depending on the type of object being fatigued.
Passes are used for multi-phase rendering.
The BasicEffect course offers a unmarried technique, which is selected past default, and which has a unmarried pass. Information technology is necessary to 'Apply' a laissez passer before you issue any cartoon commands. Our plan does that with this line of code:
basicEffect.CurrentTechnique.Passes[0].Use();
Only you will often see XNA code of this class:
foreach (EffectPass pass in event.CurrentTechnique.Passes) { laissez passer.Apply(); }
We utilise the simpler form considering we know that the BasicEffect only has 1 Pass. If we were using an effect with more than i pass, or if nosotros wanted to generalise our code so that information technology would piece of work with whatsoever Effect course, we would use the foreach loop.
The Resize Event and the New Silverlight five Threading Model
When we create the Project Transform, we need to provide the aspect ratio (width/height) of the DrawingSurface.
To keep things simple for our 'Hi World' program, we might attempt to do this in our Draw outcome handler. Just this will not work:
Float aspectRatio = (float)(drawingSurface1.ActualWidth / drawingSurface1.ActualHeight); basicEffect.Projection = Matrix.CreatePerspectiveFieldOfView(0.85f, aspectRatio, 0.01f, 1000.0f);
It throws an exception:
System.UnauthorizedAccessException: Invalid cross-thread access
The reason is Silverlight 5'southward new threading model. Previously, Silverlight did everything on its unmarried UI thread, although you did take the option of creating additional threads manually.
Silverlight 5 now does its low-level graphics work on a different thread called the 'Composition' thread. For XAML based Silverlight, you don't need to worry about this modify because your code operates on the XAML object tree and isn't involved in the low-level rendering of this.
Notwithstanding, with Silverlight-XNA, yous are working at a lower level and the Describe consequence of the DrawingSurface command executes on the composition thread. If you try to access XAML controls from the composition thread, you will get an exception.
In our program, we avert this with the local 'aspectRatio' variable, which nosotros update in the Resize event handler and so use in the Describe upshot handler. We don't do any locking on this variable, on the assumption that a 32 bit bladder is atomic.
For production code that shares more than complex information structures betwixt the composition thread and the UI thread, y'all will demand to be very careful to lock things correctly.
Invalidate
The concluding line of code in the programme is the phone call to:
e.InvalidateSurface();
Putting this call at the terminate of the Draw outcome handler causes the Draw event to exist immediately raised again. For a 3D scene that is constantly irresolute - like our rotating triangle - this gives the smoothest operation.
If your scene is static, and so y'all don't need to constantly redraw it, and you can just telephone call InvalidateSurface() when something changes.
Optimising the Draw Method
Our program is designed to be equally short and unproblematic as possible to illustrate the essentials of Silverlight-XNA.
In a real program, you volition want to optimise the critical Draw handler by separating out the one-fourth dimension setup code. The Depict handler executes every frame, due east.g., lx time a second, then you demand to proceed it as light every bit possible. In particular, you should avoid instantiating any objects in there.
Decision
That completes our run through of a very unproblematic Silverlight-XNA program.
Although it covers just a small fraction of what's bachelor in XNA, a lot of the key concepts are in there and you lot could actually build quite a circuitous 3D program using but the classes and methods illustrated here.
Annex
Since this commodity was written, Microsoft has released Silverlight 5.
The released version has tighter security constraints than the beta exam version and the user at present has to explicitly grant permission for a web site to use accelerated 3D graphics.
You need to add the following code to the main page constructor to prompt the user to do this:
public MainPage() { InitializeComponent(); if (GraphicsDeviceManager.Current.RenderMode != RenderMode.Hardware) { string message; switch (GraphicsDeviceManager.Electric current.RenderModeReason) { example RenderModeReason.Not3DCapable: message = " You graphics hardware is not capable of displaying this page "; break; example RenderModeReason.GPUAccelerationDisabled: message = " Hardware graphics dispatch has not been enabled on this web page.\n\n" + " Please notify the web site owner."; suspension; case RenderModeReason.TemporarilyUnavailable: bulletin = " Your graphics hardware is temporarily unavailable.\northward\n"+ " Endeavor reloading the web page or restarting your browser."; pause; case RenderModeReason.SecurityBlocked: message = " You need to configure your organisation to allow this web site to brandish 3D graphics:\northward\n" + " 1. Right-Click the folio\n" + " 2. Select 'Silverlight'\n" + " (The 'Microsoft Silverlight Configuration' dialog will be displayed)\north" + " 3. Select the 'Permissions' tab\north" + " 4. Find this site in the list and change its 3D Graphics permission from 'Deny' to 'Allow'\n" + " 5. Click 'OK'\due north" + " 6. Reload the folio"; break; default: message = " Unknown fault"; pause; } MessageBox.Testify(message," 3D Content Blocked", MessageBoxButton.OK); } }
Unfortunately, Microsoft has not provided good support for making an easy user experience for this.
Source: https://www.codeproject.com/Articles/289499/3D-basics-using-Silverlight-5-and-XNA
0 Response to "draw font in 3d xna"
Post a Comment